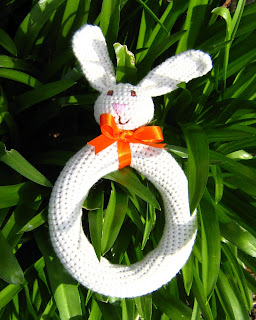
Rabbit Rattle

Crochet Rabbit Rattle for my friend's new baby.

Gardening Apron

Gardening Apron for a friend's house warming present.

No Junk for Us!

Handmade "no junk mail please" sign in Finnish.

Meet Cyril!

Cyril is an amigurumi pig, made for my nephew.

Boxy Matryoshka Pouch

Boxy pouch made with very kawaii Japanese fabric.

Wednesday, 8 December 2010

Linocut printing without cutting lino (tutorial)

Ta da! Two "linocut" cards for your viewing pleasure.
Every year I want to make my own Christmas cards, but never actually get round to it. I then spend the rest of the festive season wishing I had got my arse in gear. This year I have finally done it and made not one, but four different designs! This is a tutorial for the technique I hashed together for my first two designs. I may or may not do further tutorials for the other designs depending on how the mood takes me.

It's my first tutorial, so please bear with me. The photos are awful, but I had only a camera phone and a toddler "assistant" at my disposal. Feel free to ask questions if it doesn't make sense. And if you're a bona fide linocutter, I apologise for bastardising your fine craft.


Equipment & Materials
  • Foam tray
  • Greaseproof paper or tracing paper
  • HB pencil
  • Sticky tape
  • Pointy implement for poking said plate
  • Acyrlic paintor ink
  • Paintbrush
  • Random vaguely Christmassy yarn and embroidery thread for embellishment
  • Can of hairspray or other cylindrical object
  • Blank cards

Step 1
Foam pizza base thingy and a foam plate.

Spend a lot of time thinking about what you could use instead of lino for linocutting. Waste more time googling linocutting kits and recoiling in horror over price. Finally remember that the pizza you had two days ago had a foam plate and root through rubbish bin to retrieve it.


Step 2
Robin card sketch.


Having already had your "ah ha!" design moment in the shower, sketch your design on a random piece of paper. It doesn't need to be a work of art - simple and bold is the way to go. Then draw round your card blank and be happy that fortune has smiled on you and it will fit on the cards all nicely.


Step 3
Design traced on to greaseproof paper, minus some details.

Trace your design on to the greaseproof paper that you've liberated from the kitchen. Make sure you cut off only the small square that you need so that there will be a funny and not really usable shape for any future legitimate cooking purpose.


Step 4
Transferring the design to the foam plate.

Stick your greaseproof paper to the foam plate with the tape. Scribble over the design to transfer it to the plate. It helps if you have turned the paper over first so that you are not simply obliterating your efforts.


Step 5
Ready to poke? Yes, siree!

Grasp your poking implement - I used a blunt probe from my old Zoology dissection kit - and carefully poke around the design. Once you've gone around the whole thing, gleefully poke, poke, poke in all the white space and squash it down with the handle of your poking device. This step can prove satisfyingly annoying to your other half who is playing an equally annoying racing game on the PS3.


Step 6
Ink up your block. I used acrylic paint.

Cut round your newly created printing block and tape it to the table. Carefully apply paint with paintbrush and lay a piece of scrap paper over the block. Squash it down with your fingers, being careful not to move it. Then roll over it with your can of hairspray (no, don't bodily roll over it while holding the can...).


Step 7
Carefully does it. Ooh the anticipation...

Peel back the paper and behold the wonder that is your printed design! If you're happy with it, repeat step 6 with your blank cards. I managed to eke 19 cards out of mine, but after that the printed image was getting too fuzzy. 


Step 8
Embellish away, my friends!

Once the cards have dried, embellish them however you see fit - I used a red ink pencil and some sparkly yarn from my stash for one design and some embroidery thread for the other.


Step 9
Dither about how to print the greeting inside and wonder if you will actually manage to post them before the last posting date. Finally decide to use some proper stamps and then wait impatiently for them to arrive in the post. Continue waiting and start waking up in the night panicking about it. [Note: still waiting...]

And there you have it. If you try this out I'd love to see your efforts.

Wednesday, 26 May 2010

Ceiling trapdoor TV

How's this for a neat way to hide the TV when it's not in use? Not to mention a sure fire way to keep those sticky fingers off your flatscreen.

This one is part of a bedroom remodelling carried out by Dijeau & Poage construction company in San Francisco. Reckon you could do it yourself with a bit of thought and careful DIY though. Just make sure it's really, really securely fixed up there...

(via Unplggd)

Tuesday, 25 May 2010

Keeping bath toys mould-free


This is not something I'd normally post about here, but when I was bathing my son last night I was reminded of the endless experiments we ran to stop our bath toys growing that scourge of the bathroom, black mould (mold). Mr Crafty Cactus reckons this is something that other people would like to know and I think he's right*.

I've always squeezed out all the water from the toys after a bath and that is important. However, it's not enough to stop the mould. Keeping the toys in a net to dry doesn't seem to make much difference and as ours kept falling down, I have abandoned it. Our toys now sit on the windowsill, usually lined up neatly by Mr V (anything to avoid getting out of the bath).

I tried using a weak disinfectant solution on the toys when they got mouldy. It made no difference to the mould and just served to worry me further. I didn't want Mr V ingesting mould, but I certainly didn't want him ingesting disinfectant. Those toys went in the bin (one by one, so they weren't missed).

Finally, Mr Crafty Cactus became interested. And of course solved the problem, so as to gain maximum smug points. What did he do? He first boiled all the toys in a large saucepan. I've got one I keep for dyeing things, so he used that. Then he made sure that each toy was full of water and microwaved them for a bit.

He did this a few months back and so far, no sign of the black stuff. I've continued to squeeze all the water out of the little blighters after each bath, but otherwise we've done nothing else. Problem solved. Hoorah.

As for non-slip bathmats, we just take ours out and lay it over the tub, sucker side up when it's not in use. No mould there either.

*I do have a slight concern that we are the only people worrying about this. Are we?

Saturday, 15 May 2010

Amigurumi cacti in crackle glaze pots

Julie over at Gleeful Things created these adorable amigurumi cacti for her mother and grandmother. I really should get round to making some myself - I've been thinking that a selection of ami cacti would make a great header.

Julie also did the crackle glazing on the pots - have a go yourself by following her tutorial.

If you fancy making your own ami cacti, there's a free pattern for a similar cactus over at Ana Paula's Amigurumi Patterns & Random Cuteness.

Thursday, 13 May 2010

Pixellated PacMan cufflinks

Novelty cufflinks are nothing new, but these pixellated lovelies are surely something else! I love the idea of geek-chic things like this, things that most people won't notice that you can wear safe in the knowledge of your own geek supremacy.

Perhaps Mr Crafty Cactus needs some of these for Fathers' Day. If you or your man want need some of these, amble over to BeauJangles' stall on Makers Market. The Space Invaders are pretty neat too.

(via Craft)

Monday, 10 May 2010

Fabulous fireworks print chair revamp

I just love furniture revamps and here's one that features the lovely Fireworks print fabric by Jessica Jones (of How about orange...). This top job was carried out by Melissa Swanson - check out her blog post for the full details.

And don't forget to pop over to Jessica's blog while you're out and about - it's one of my RSS reader favourites.

Minesweeper pillows with sound effects!

Everyone has wasted hours playing minesweeper when they're supposed to be doing something else more productive, but few people have gone to the effort of bringing the game into their real lives. Meet instructables member BritLive who crafted these fabulously geeky pillows.

What I like about these is that  inevitably some people who come round to your house wouldn't realise what they were. So, in effect these pillows would act as geek radar. And even the non-geeks would surely be amused by a bomb explosion upon sitting.

(via Craft)

Sunday, 9 May 2010

Omlet's beautiful Beehaus

I knew we could trust Omlet, the people behind the urban henhouse Eglu to come up with something equally cool for the wannabe bee keepers among us. And I just knew they'd give it a good name and they have not disappointed on that front - meet the Beehaus!

Now, I don't profess to know much, if anything, about keeping bees, but I was very surprised to learn that one Beehaus could produce 1,400kg of honey a year. That's a lot of sticky stuff. Omlet do suggest that you take honey instead of wine to dinner parties and with that volume to deal with, you'll definitely need to come up with some kind of plan to get shot of it.

Of course, you could sell it to help pay back the £500 plus start up cost. By my reckoning, you'll be laughing all the way to the bank once you've flogged 250 jars. And you'll still have 2,550 left to find homes for.

(via Wired magazine 06.10)

Knitted antique chairs by Melanie Porter

Here's something that appeals to two of my favourite things at the same time - old furniture and fibre-art. Ex-knitwear designer Melanie Porter finds old chairs in auctions and markets across the UK and gives them a new lease of life through careful restoration and reupholstering before she covers them with handknitted panels.

I've chosen Henry (see left) to demonstrate Melanie's talents - a fine chair who's on-trend to boot. Alas, there are no prices on her website, so I suspect that means Henry won't be coming to live with me. But perhaps he or one of his friends could come over to your place? Melanie takes commissions too, if you've got an old Bergere that deserves a facelift.

(via guardian weekend magazine, 08.05.10)

Lufdesign's leaf cable ties

How about this for a simple, yet brilliant idea? Cable ties with little leaves on the ends, making them both functional and attractive. With these babies on-hand you can prettify your copious cables and give up on the much harder task of hiding the messy buggers.

The Leaf Ties are the brainchild of Korea-based Lufdesign. They weren't originally planning to sell direct to the public, but because of the happy problem of lots of consumer interest they are shipping via airmail. If you're quick you might just grab some for yourself...

Wednesday, 21 April 2010

Fairy cake semi-fail

Mr V and I made some fairy cakes today (mini cupcakes). They taste great, but my attempts at icing (after Mr V had gone to bed) aren't quite so great:


I iced them all and then tried to put the sprinkles on. Turns out that doesn't work too well. I had to poke each tiny sugar star into the icing. So, next time it's ice-then-sprinkle, ice-then-sprinkle, ice-then-sprinkle etc, etc.

The recipe is from Easy to Make! Cakes and Bakes (Good Housekeeping). First one I've tried from there, but so far, so good...

Wednesday, 31 March 2010

Rabbit Rattle

My friend has had her baby and while I haven't given her the presents yet (Mr V and I are holed up with a bad cold), I can share my latest makes with you because she hasn't mastered being online and breastfeeding just yet. First up, a crochet rabbit rattle.


Over-reaction Man (new name for hubby, hereafter known as ORM) took the photos outside for me. I think the one in the tree came out best, but it makes the rattle look deformed, hence sharing both images. (Side note: if only the weather was like that now - it's hideous outside today, storm central.)

The pattern was from Crochet Today May/June '09 by Vicki Howell and should have looked like this:


Mine came out quite differently, as you can see. But as a wise woman
once said: "There's no such thing as the crochet police". So there.

Sunday, 21 March 2010

I'm back and I'm crafting again

I'm not going to apologise for not posting - it seems every second blog has such a post - but suffice it to say that I'm back and I'm making stuff. Not right this second, of course, but later today and yesterday and no doubt tomorrow as well. I can't share what I'm making just yet, because it's baby stuff for my friend whose due date was yesterday. Hopefully soon!

Little update on what's happening Chez CCL: we've moved down to the Kent coast. I feel like I've come home (I'm from East Kent originally). We've rented a lovely large top floor flat which overlooks shared private gardens for local residents only (how posh!). I've set up my own business and am working from home. Hubby has got himself a swish job in the Big Smoke (yes, where we just moved from, doh!). And Mr V has settled into nursery after several false starts - he only goes three afternoons a week, but that's enough for now to give me time to get my work done.

All very exciting. Hopefully some crafting news soon :)


Photo of a local park back when we had snow (taken by Hubby).

Twitter Delicious Facebook Digg Stumbleupon Favorites More